Difference between revisions of "Shop Apps Setting"
From Shopnix Help
(Created page with "== How to create Google Appid and Appsecret? == 1- Login to the Google account by your credentials. 2- Go to http://console.developers.google.com/projects . 3- Click on Cre...") |
(→How to create Google Appid and Appsecret?) |
||
| Line 7: | Line 7: | ||
3- Click on Create Project. | 3- Click on Create Project. | ||
| − | [[Image: | + | [[Image:createproject1.png]] |
| − | 4- Write Project Name as your Shop Name and no need to do | + | 4- Write Project Name as your Shop Name and no need to do with Project Id field then click on create button. |
| − | [[Image: | + | [[Image:create.png]] |
| − | 5- Go to APIs & | + | 5- Go to APIs & Auth > Credentials. |
| − | [[Image: | + | [[Image:credentials.png]] |
| − | 6- Now click on | + | 6- Now click on- |
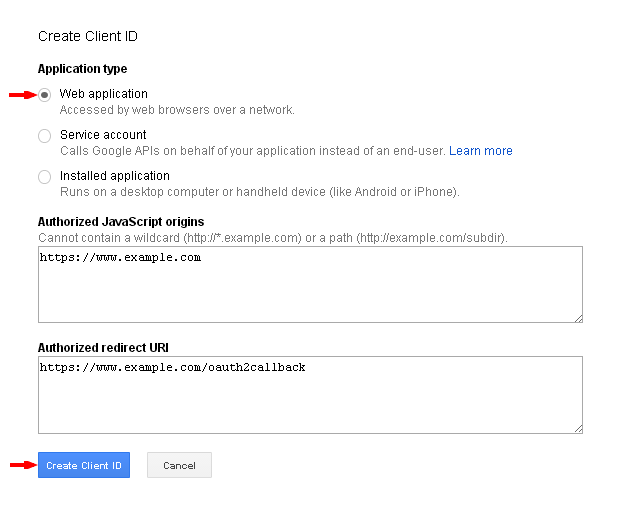
| − | [[Image: | + | [[Image:createclientid.png]] |
| − | 7- Select Application Type – Web Application and give the Authorized Redirect URL and click on | + | 7- Select Application Type – Web Application and give the Authorized Redirect URL and click on Create Client Id button as shown in below image- |
| − | |||
| + | [[Image:clicktocreateid.png]] | ||
| − | 8- In redirecting page Appid = Clientid and Appsecret=Clientsecret | + | |
| − | 9- Now Go to Shopnix Store Admin > Setup > Apps. To enable the registration using Google account. | + | 8- In redirecting page Appid = Clientid and Appsecret=Clientsecret as shown in below image- |
| + | |||
| + | [[Image:createdidsecret.png]] | ||
| + | |||
| + | |||
| + | 9- Now Go to Shopnix Store Admin > Setup > Apps. To enable the registration using a Google account. | ||
[[Image:enable.png]] | [[Image:enable.png]] | ||
| − | After making enable this feature you need to click on setting button which will be redirected to | + | After making enable this feature you need to click on the setting button which will be redirected to your on Edit Shop App Google Login page- |
[[Image:fill.png]] | [[Image:fill.png]] | ||
| − | Here you need to fill the Appid and Appsecret now you’re your shopnix store is ready to login | + | Here you need to fill the Appid and Appsecret now you’re your shopnix store is ready to login to Google account. |
Revision as of 11:21, 5 May 2014
How to create Google Appid and Appsecret?
1- Login to the Google account by your credentials.
2- Go to http://console.developers.google.com/projects .
3- Click on Create Project.

4- Write Project Name as your Shop Name and no need to do with Project Id field then click on create button.

5- Go to APIs & Auth > Credentials.

6- Now click on-

7- Select Application Type – Web Application and give the Authorized Redirect URL and click on Create Client Id button as shown in below image-

8- In redirecting page Appid = Clientid and Appsecret=Clientsecret as shown in below image-

9- Now Go to Shopnix Store Admin > Setup > Apps. To enable the registration using a Google account.

After making enable this feature you need to click on the setting button which will be redirected to your on Edit Shop App Google Login page-

Here you need to fill the Appid and Appsecret now you’re your shopnix store is ready to login to Google account.