Difference between revisions of "Order/Shiprocket"
From Shopnix Help
(→Where will I get Shiprocket Integration ?) |
(→Where will I get Shiprocket Integration ?) |
||
| (5 intermediate revisions by the same user not shown) | |||
| Line 32: | Line 32: | ||
<div align="justify"> | <div align="justify"> | ||
Go to '''STORE MANAGER > SETUP > APPS''' | Go to '''STORE MANAGER > SETUP > APPS''' | ||
| + | |||
<div class="wiki-img"> | <div class="wiki-img"> | ||
[[image:shiprocket1.png | frameless | 1200px]] | [[image:shiprocket1.png | frameless | 1200px]] | ||
</div> | </div> | ||
| + | |||
Go to '''SHIPROCKET''' , click on the option (red square in the below image) and '''ENABLE''' the '''SHIPROCKET''' Option | Go to '''SHIPROCKET''' , click on the option (red square in the below image) and '''ENABLE''' the '''SHIPROCKET''' Option | ||
| + | |||
<div class="wiki-img"> | <div class="wiki-img"> | ||
[[image:shiprocket2.png | frameless | 1200px]] | [[image:shiprocket2.png | frameless | 1200px]] | ||
</div> | </div> | ||
| + | |||
Now the option for '''SHIPROKCET''' Should display as '''ENABLED''' | Now the option for '''SHIPROKCET''' Should display as '''ENABLED''' | ||
Now, go to '''ORDERS>ORDERS LIST''' | Now, go to '''ORDERS>ORDERS LIST''' | ||
| + | |||
<div class="wiki-img"> | <div class="wiki-img"> | ||
[[image:shiprocket3.png | frameless | 1200px]] | [[image:shiprocket3.png | frameless | 1200px]] | ||
</div> | </div> | ||
| + | |||
After clicking on '''ORDERS''' button the '''ORDERS LIST''' will be displayed like below image. | After clicking on '''ORDERS''' button the '''ORDERS LIST''' will be displayed like below image. | ||
| + | |||
<div class="wiki-img"> | <div class="wiki-img"> | ||
[[image:shiprocket4.png | frameless | 1200px]] | [[image:shiprocket4.png | frameless | 1200px]] | ||
</div> | </div> | ||
| + | |||
On clicking '''PICKUP''' option as shown in the below image. | On clicking '''PICKUP''' option as shown in the below image. | ||
| Line 61: | Line 69: | ||
[[image:shiprocket5.png | frameless | 1200px]] | [[image:shiprocket5.png | frameless | 1200px]] | ||
</div> | </div> | ||
| + | |||
You will be able to see fields for '''API User Details''' to enter the details(However it is a one time setup) | You will be able to see fields for '''API User Details''' to enter the details(However it is a one time setup) | ||
| + | |||
<div class="wiki-img"> | <div class="wiki-img"> | ||
[[image:shiprocket6.png | frameless | 1200px]] | [[image:shiprocket6.png | frameless | 1200px]] | ||
</div> | </div> | ||
| + | |||
| + | |||
| + | After clicking on '''NEXT''' you will be able to add '''PICKUP ADDRESS''' | ||
| + | |||
| + | |||
| + | <div class="wiki-img"> | ||
| + | [[image:shiprocket7.png | frameless | 1200px]] | ||
| + | </div> | ||
| + | |||
| + | |||
| + | After clicking on '''NEXT''' you will be able to add '''Package & Dimensions''' | ||
| + | |||
| + | <div class="wiki-img"> | ||
| + | [[image:shiprocket8.png | frameless | 1200px]] | ||
| + | </div> | ||
| + | |||
| + | After clicking on '''NEXT''' you will be able to select '''Payment Mode''' | ||
| + | |||
| + | <div class="wiki-img"> | ||
| + | [[image:shiprocket9.png | frameless | 1200px]] | ||
| + | </div> | ||
| + | |||
| + | After clicking on '''SUBMIT''' you will be able to select '''COURIER PARTNER''' of your choice | ||
| + | |||
| + | <div class="wiki-img"> | ||
| + | [[image:shiprocket10.png | frameless | 1200px]] | ||
| + | </div> | ||
| + | |||
| + | After selecting '''COURIER PARTNER''' you will be able to select '''TRACK''' your order. | ||
| + | |||
| + | <div class="wiki-img"> | ||
| + | [[image:shiprocket11.png | frameless | 1200px]] | ||
| + | </div> | ||
| + | |||
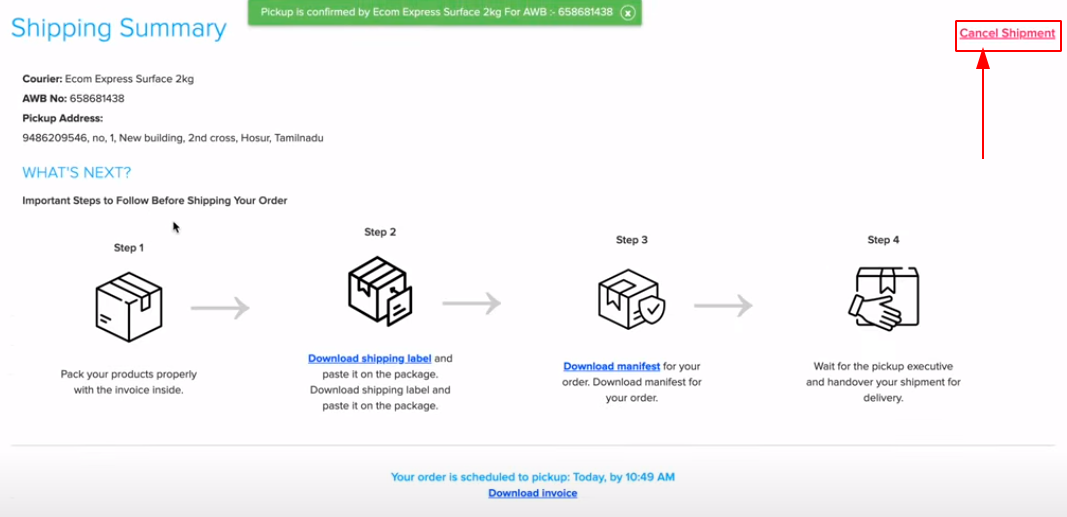
| + | You can also '''CANCEL SHIPMENT''' in case if you wish to cancel the order, by clicking on the '''CANCEL SHIPMENT''' button as displayed in the below image. | ||
| + | |||
| + | <div class="wiki-img"> | ||
| + | [[image:shiprocket12.png | frameless | 1200px]] | ||
| + | </div> | ||
| + | |||
| + | |||
| + | This is the process to integrate, SHiprocket with Shopnix, Shiprocket Fulfillment provides comprehensive fulfillment services, managing everything from inventory reception to end-customer shipping. With us, you can skip the hassle of packing boxes and frequent courier trips. Simply integrate your Shopnix eCommerce store with Shiprocket Fulfillment, and we'll handle the rest, ensuring smooth operations and satisfied customers. | ||
If you have more queries or would like assistance with this please contact us on [mailto:support@shopnix.in support@shopnix.in]. | If you have more queries or would like assistance with this please contact us on [mailto:support@shopnix.in support@shopnix.in]. | ||
</div> | </div> | ||
</div> | </div> | ||
Latest revision as of 09:59, 20 March 2024
Contents
What is Shiprocket integration?
Shiprocket is a logistics platform in India that helps eCommerce businesses manage their shipping needs. Shiprocket integration with an eCommerce store refers to the process of connecting Shiprocket's services with an online store's platform, such as Shopify, Shopnix WooCommerce, Magento, etc.
This integration allows eCommerce merchants to streamline their shipping operations by automating tasks such as order processing, label generation, courier selection, tracking, and more.
Why do we need to Integrate with Shiprocket ?
Shiprocket Fulfillment will take care of all your fulfillment needs, starting from receiving the inventory to shipping it to the end customer. You don't need to pack boxes and run to the courier company every day. All you need to do is connect your Shopnix eCommerce store with Shiprocket Fulfillment, and we will do the rest!
How to Integrate Shiprocket ?
Integrate your Shopnix eCommerce store with your Shiprocket account and process all orders from one single platform. Sync the inventory and catalog from your website to receive all incoming orders into the panel. Stay in sync with your incoming orders while you process the current ones.
Where will I get Shiprocket Integration ?
Go to STORE MANAGER > SETUP > APPS
Go to SHIPROCKET , click on the option (red square in the below image) and ENABLE the SHIPROCKET Option
Now the option for SHIPROKCET Should display as ENABLED
Now, go to ORDERS>ORDERS LIST
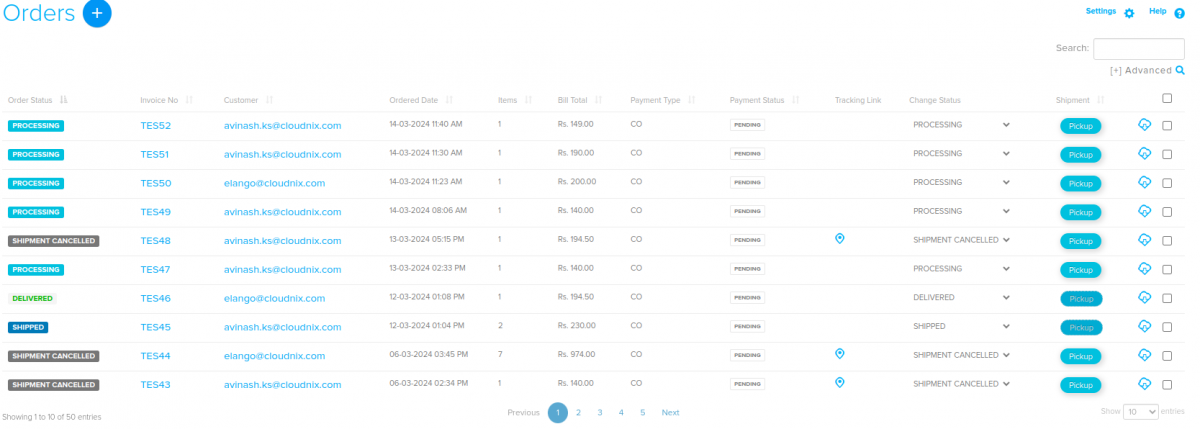
After clicking on ORDERS button the ORDERS LIST will be displayed like below image.
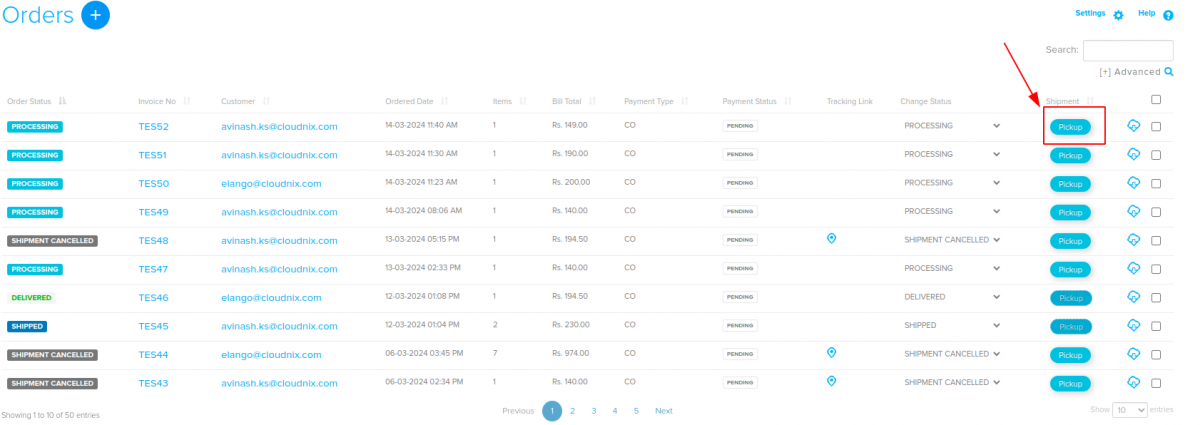
On clicking PICKUP option as shown in the below image.
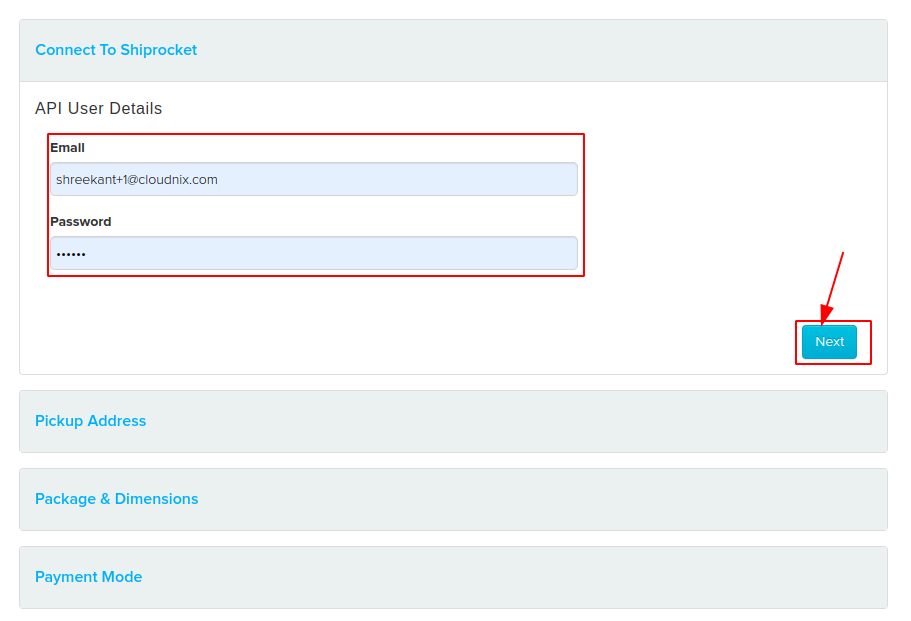
You will be able to see fields for API User Details to enter the details(However it is a one time setup)
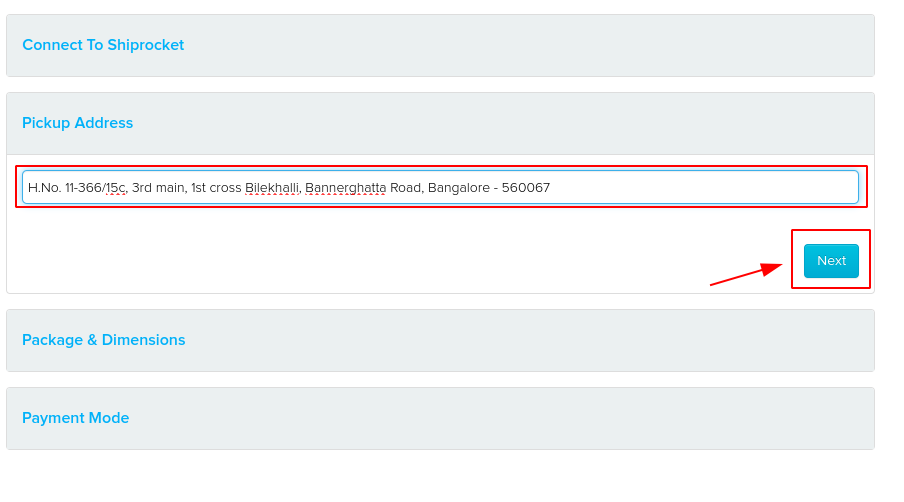
After clicking on NEXT you will be able to add PICKUP ADDRESS
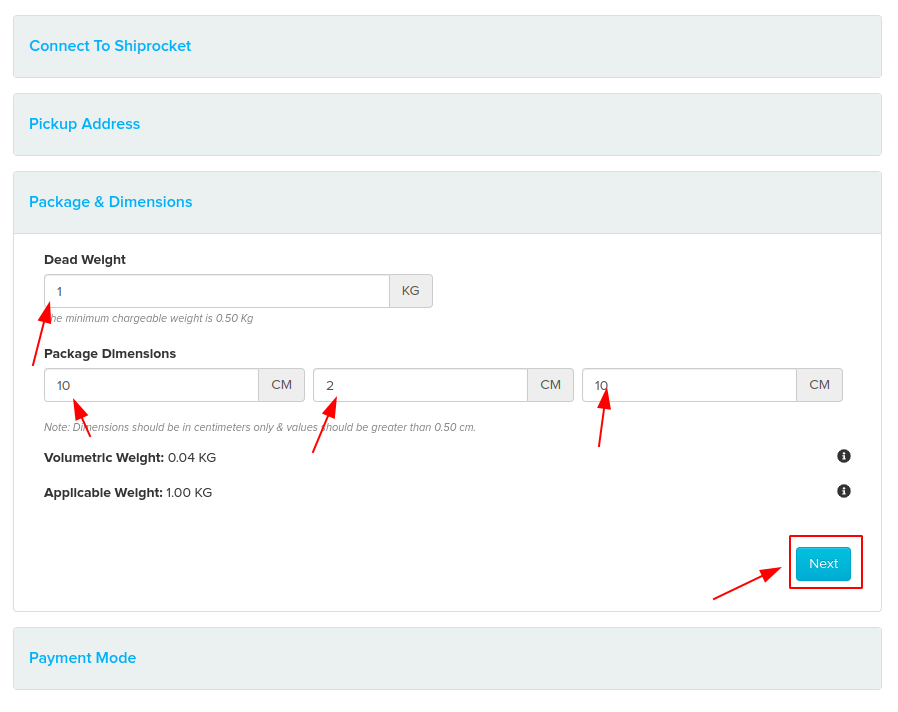
After clicking on NEXT you will be able to add Package & Dimensions
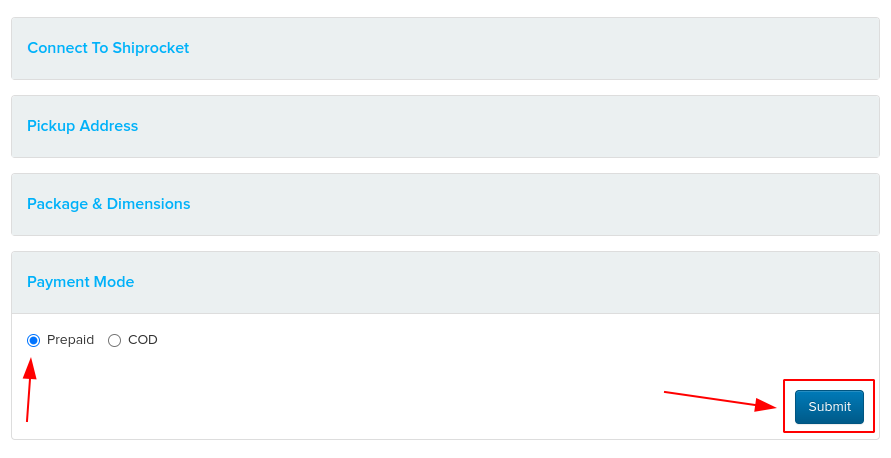
After clicking on NEXT you will be able to select Payment Mode
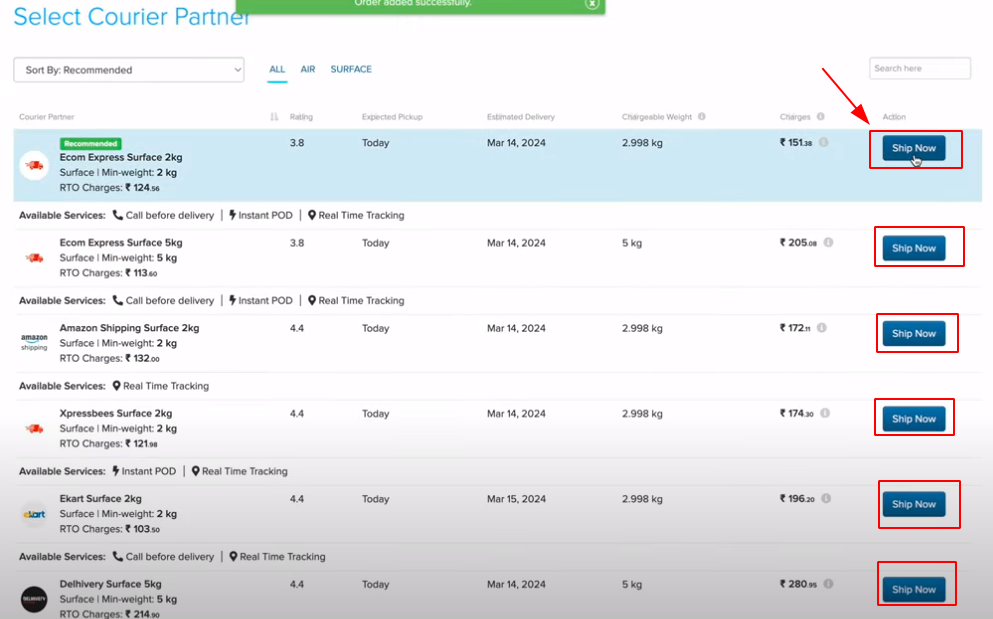
After clicking on SUBMIT you will be able to select COURIER PARTNER of your choice
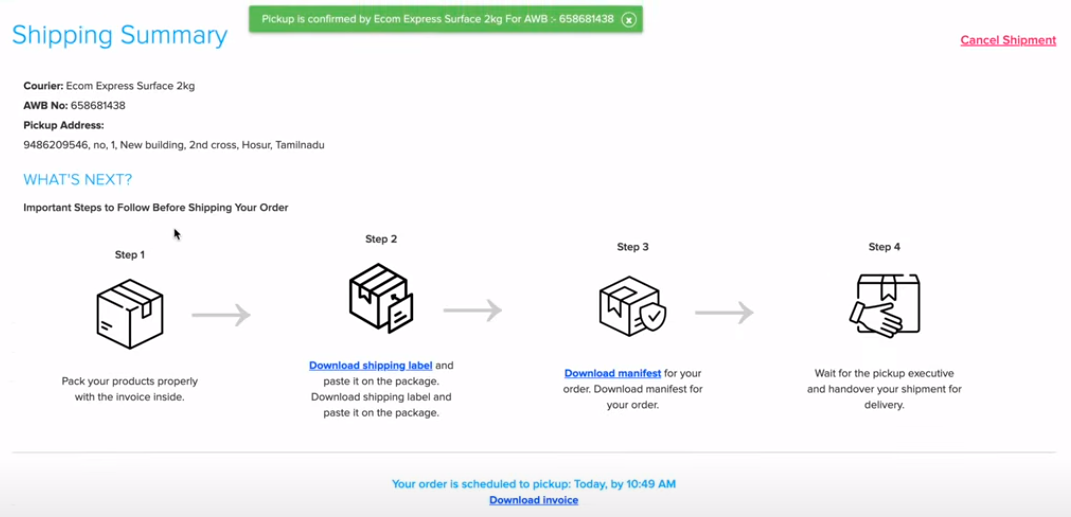
After selecting COURIER PARTNER you will be able to select TRACK your order.
You can also CANCEL SHIPMENT in case if you wish to cancel the order, by clicking on the CANCEL SHIPMENT button as displayed in the below image.
This is the process to integrate, SHiprocket with Shopnix, Shiprocket Fulfillment provides comprehensive fulfillment services, managing everything from inventory reception to end-customer shipping. With us, you can skip the hassle of packing boxes and frequent courier trips. Simply integrate your Shopnix eCommerce store with Shiprocket Fulfillment, and we'll handle the rest, ensuring smooth operations and satisfied customers.
If you have more queries or would like assistance with this please contact us on support@shopnix.in.


